
I ate a lot of peanut butter and jam sandwiches as a kid; not because I was picky, but because I just loved them. Sometimes my mom would throw some banana slices in, or swap the jam for honey, but whatever the combo, it was the ultimate comfort food.
Years later, I still enjoy the satisfaction that comes with the occasional stick-to-the-roof-of-your-mouth kind of treat, but I skip the Skippy for tastier, more mature flavour prospects. I am a grown-up after all.
And as the adult that I am, I find myself pretty obsessed with nut butters of all persuasions. Sesame tahini, cashew, pumpkin seed, almond, hazelnut…the list goes on. Nut butters are versatile, working their magic in everything from savory to sweet, and adding a richness and high satiety factor to just about any meal. Happily, grocery stores are now providing many options beyond the peanut version these days, but of course, I prefer to make it myself at home. Like many of the “DIY” foods here at My New Roots, making your own nut butter is, I must say, disappointingly easy. One ingredient. A little roast, a quick blend. Bob’s your uncle. What’s the payoff you ask? Besides feeling pretty darn self-righteous, you get to enjoy something that I confidently wager, is better than any store-bought version you’ve ever tasted. In fact, I promise you that it is. And, you can control the ingredients by selecting the finest nuts, roasting them just the way you like, and adding only the things you want. There won’t be any refined sugars, hydrogenated fats or stabilizers lurking around in your nut butter. Heavens no!
The idea for these cookies came to me the other day when I had just whipped up a fresh batch of almond butter, the mind-altering aroma of freshly roasted nuts wafting through my little home, inspired me to skip the sandwich and go straight to dessert. I am so bad, but you can punish me later. For now, you can just thank me, because the Almond Butter and Jam Sandwich Cookie was born and you get to enjoy it. I have no doubt that when you catch a whiff of your own almond butter whizzing up, besides the impulse to spread it on various parts of your body, ahem, you will also find the inspiration to make something beyond a sandwich. Or even a sandwich cookie.
I leave it to you. Just be responsible. You are a grown-up after all.
Raw or Roasted? A Nutty Path to Choose
When we eat raw nuts, we also eat the enzyme inhibitors that prevent the seed from sprouting on the grocery store shelf. This takes a real toll on our digestion, since these enzyme inhibitors also prevent our own bodily enzymes from breaking down the food in our digestive tracts, inhibiting absorption of precious vitamins and minerals. Although we’ve been led to believe eating handfuls of raw nuts everyday is tops for our health, this practice in fact, is extremely hard on our digestion.
There are two ways to destroy enzyme inhibitors, soaking and roasting.
I have spoken several times about soaking nuts, because in my opinion, it is absolutely the best way to consume them. However, from time to time we all need a little change and roasting nuts, just lightly, not only increases their digestibility, but brings out an entirely different flavour profile that blows plain ol’ raw nuts out of the water.
As is the case with most packaged food, the term “roasted nuts” that you see on the label is a little misleading. You see, roasted nuts are raw nuts essentially deep-fried in saturated palm kernel or cottonseed oil, heavily salted and frequently have other add-ins like corn syrup, flavoring agents and preservatives. If you ever buy roasted nuts, look for the words “dry roasted” and read the ingredient list to ensure that what you are buying is in fact, just nuts.
Better yet, roast your own! This process is incredibly easy and will produce a very tasty treat without any extra fat, additives or preservatives. You can enjoy nuts this way, or blend them up to make the nut butter of your dreams. Get creative – combine two or more of your favorite roasted nuts and seeds to make delicious nut butter blends, like sesame-cashew, pecan-pumpkin, or almond-hazelnut-sunflower. Just make sure to roast the nuts and seeds separately, as they require different roasting times, respectively.
Almond Butter
Makes approximately 1 cup
Ingredients:
2 cups shelled raw/natural almonds (not roasted or salted)
Directions:
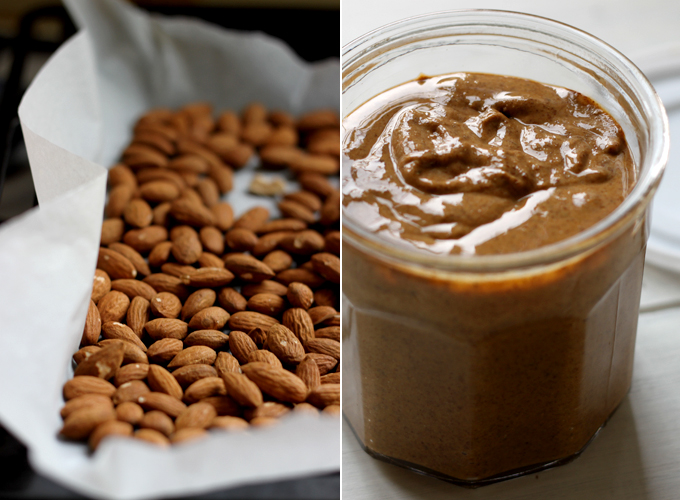
1. Preheat oven to 300°F/150°C. Spread the almonds out in a single layer on baking sheet and roast for 20-30 minutes until fragrant and slightly darker in colour (a good way to check is to bite one in half and check the colour in the center. Instead of white, it should be golden). Remove from oven and let cool completely.
2. Transfer the cooled almonds to a food processor and blend on highest setting for 1-2 minutes to finely grind them to a powder. Scrape down the sides of the container. Continue to process the nuts an additional 1-2 minutes until the oils start to be released, and a smooth, creamy, runny paste is formed. Transfer the almond butter to an airtight glass container and store in the refrigerator. Keeps for 1 month.
*Tip* If you want chunky almond butter, remove a generous scoop of the chopped nuts from the food processor before it turns into a powder. Set aside. Fold it to the creamy almond butter before storing.
And in case you haven’t read it before, you can see how my whole nut butter obsession began with my Hazelnut Butter recipe here.

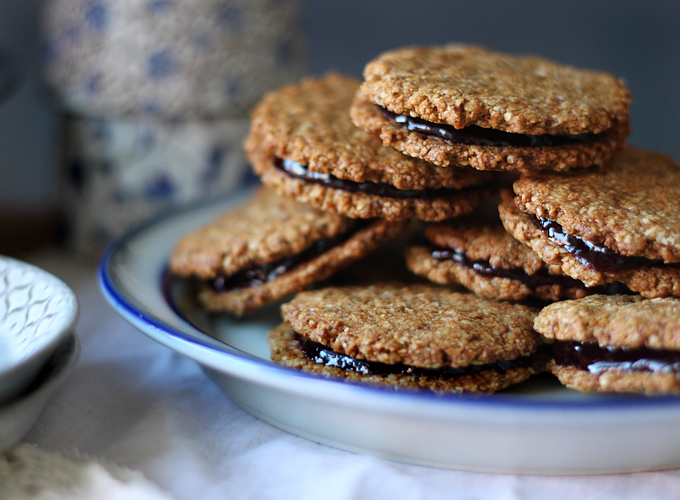
Is it obvious to state that these cookies are really, really good? The almond butter biscuits are crispy and delicate, almost lacy, and not too sweet, embracing an oozy, syrupy center that creates that fine balance between the inside and out.
You can choose any jam you like – I just happened to have my mother-in-law’s incredible homemade black currant jam on hand. I found this particular flavour so complimentary to the cookies, because it’s just the slightest bit sour. I recommend you go for a jam that runs along the same, tart lines as it creates a more sophisticated flavour pairing with the cookies themselves. Think of the final product as a grown-up version of PB&J, even though kids of all ages will go crazy for it. The AB&J – the A is for Almond not Adult. That would be boring.
As a bonus, I made these treat vegan and gluten-free for everyone to enjoy. The chia seeds replace the egg, while adding fiber, and although you may be skeptical about the texture, you’ll be amazed at how the crunchy little seeds disappear into the crisp cookies. Coconut oil replaces butter (which you can use instead), but make sure to not use virgin coconut oil, as this type has a strong coconut flavour – find the one without a scent or you’ll end up with a very tropical tasting cookie indeed.
I used coconut palm sugar in this recipe, a relatively new ingredient to me, but one I’ve grown pretty fond of. It’s the dried sap from the coconut palm flower and is the “no brainer” of sugar replacements, as you can swap it 1:1 for the white processed stuff. I’ll talk more about coconut palm sugar in another post, but if you can’t get a hold of any try using any dry sweetener that you like.

Almond Butter & Jam Sandwich Cookies
Makes 20 cookies
Ingredients:
4 Tbsp. coconut oil, softened (you could also use butter)
4 Tbsp. almond butter
½ cup / 75 grams coconut sugar
2 Tbsp. chia seeds
4 Tbsp. water + 2 Tbsp. pure maple syrup
1 tsp. vanilla extract
1 ½ cups / 200 grams oat flour (grind gluten-free rolled oats in food processor)
1 tsp. baking soda
¼ tsp. sea salt
Jam or jelly of your choice
Directions:
1. Combine water and maple syrup in a small bowl, add chia and stir well. Set aside for at least 15 minutes to form a gel. Preheat oven to 350°F/ 175 °C.
2. Blend rolled oats in a food processor to make flour (a heaping 2 cups of oats should make the 1½ cups required for the recipe). Add baking soda and salt, pulse to mix.
3. In a large bowl whisk coconut oil and almond butter together until creamy. Add coconut sugar, vanilla, and chia gel, whisk to combine. Add the dry flour mixture in thirds, folding to incorporate. By the end you will have a rather stiff dough that you may need to mix with your hands.
4. Line a baking sheet with parchment paper. Form the dough into 40 balls, roughly a level tablespoon’s worth. When all the balls have been made, take a flat-bottomed drinking glass and press the dough into rounds about 2”/ 5cm across. Bake for 8-10 minutes until just starting to brown on the bottom.
5. Let cool for a couple minutes, then place cookies on a cooling rack. When they have cooled completely, place a teaspoon or so of jam in the middle of 20 cookies, and place remaining cookies on top, pressing slightly to spread the jam (to keep the cookies crisp, only fill those that you will be eating that day). Serve.

Thanks delicious cookies and explanation, I’m really enjoying reading your posts!
I have just a question regarding the almond butter. Before roasting them do we have to soak overnight or simply the roasting is enough to destroy the enzymes inhibiting the absorption of vitamins and so?
Hi Sarah, this recipe looks amazing. Really wna try this asap! But can i sub the 4tbsp of coconut oil with more nut butter instead?
Wow, do these look amazing. Speechless.
Now we just need that yummy black currant recipe to go with this! Pretty please!?
Thanks!!
Kika
Awesome.. but now we still need that yummy black currant jam recipe!!! Pretty please!?! 😛
Thanks!!
Kika
I made these twice. The first time I filled them with some bad jam and I don’t think I ever came to liking them. I made them a second time just as thin cookies without jam and I was literally addicted to them. I kept them in the fridge and I always had some after dinner. They are really amazing. I only use 1/4 cup sugar though, as I love sweets but find most things too sweet, ironically. Also I end up getting about 20 individual cookies from each batch. Why is that?
Can I skip the sugar totally? Ah, and can I use apple syrup instead of maple?
These look seriously amazing, imagine serving these up for tea…
Just made these, they’re fantastic! I made them with organic peanut butter and organic gluten free flour, they worked out super (and taste delicious even without jam, too good). Thanks so much for this recipe.
Sarah, do we keep the almond butter in the fridge? How long does it last? Kisses from Argentina 🙂
I always come back to this recipe for parties/gatherings and they’re always a favorite; especially mine. Thanks for being a good genius.
I entered the ingredients on Calorie Counter website to calculate nutrition – note this is for 28 not 20 cookies. ( I made smaller cookies.)
Calories 67
Calories from Fat 34
Total Fat 3.8g 6%
Saturated Fat 1.9g 10%
Sodium 28mg 1%
Carbohydrates 7.6g 3%
Dietary Fiber 0.7g 3%
Sugars 3.5g
Protein 1.2g
Vitamin C 0%
Calcium 1% · Iron 2%
These are more of an oatcake than an almond flavor, but tasty with jam.
My goodness, these cookies were delicious! My family and friends loved them . It’s a keeper, and i cant wait to make those again.
Great blog…new favorite site!
Hi Sarah,
Today I made these cookies and they taste soooo good! I just made a little change. Instead of maple syrup, I used Agave syrup, and I used 1 cup of Quinoa flour and 1/2 cup of oat flour. They tasted so good! Thank you so much for your wonderful recipes! I love your blog, it had grown a love inside of me for organic, healthy, vegetarian food, and of course this is a precious gift for my body. Thank you again 🙂
Clara
Do we have to sterilize jars for the almond butter like we do for canning Jams? The whole botulism thing scares me. Or do you only need to worry if you are keeping more than one month?
I’m hooked on these!
Hi there, i love this recipe and i have made it twice and both times, my cookie dough never got too stiff to the point that i had to use my hands and judging based on your pictures, my cookie came out softer, less crispy causing the jam i put in between them to cause the cookie to be soggy. is there something I’m doing wrong? i am a baker and i followed your recipe exactly. i live in minnesota and it’s currently winter going into spring so warm weather isnt an issue
Just poped these out of the oven and let them cool down. Put Dunee Orange Marmalade and these are awesome!
I need to second the question posed by ElizMichelle – must we soak the almonds first?
If you are roasting almonds for almond butter, is it necessary to soak them first?
Hi thanks for sharing the nice post for health like as DIY Almond Butter.
can this be dehydrated instead of baked in the oven?
Thanks for sharing information on this blog, i have visited your blog great post….!!!!
Containers toowoomba
thanks for posting.
These are excellent food…
Health Shop Toowoomba
I ended up with half of the amount of cookies because I couldn’t stop eating the batter/dough! So delicious! My friends were obsessed with these!
Hi There,
Just a note to let you know I shared your awesome recipe on my monthly recipe round-up: Mother’s Day Edition. If you get a chance, come on over and check out the other inspiring recipes from sweet indulgence to homemade gifts.
http://www.thetastyalternative.com/2012/04/monthly-round-up-mothers-day-edition.html
Be Well,
–Amber
P.S. I made your almond butter!! Just delicious. I soaked the almonds first for about 18 hours, then let them air dry overnight on a towel, then roasted. Thank you for the inspiration! 🙂
just made these and the are DELICIOUS! thinking this dough might make a good thumbprint cookies too.
These look delicious. I want one right now! I love the idea of creating nut butter blends. Though I love almond butter, I’ve yet to make my own… It’s time to change that 🙂
Just made some pecan butter, using your instruction. It’s amazzzzzzzzzzing!! Thanks for the inspiration 🙂
I’ve just discovered “other nut” butters (I’m a peanut butter lover at heart). I intend to try them all! Almond butter was next on my list. What better way to try it than the homemade version?
Thank for for the recipe.
Emilie
http://www.liveeatsmile.blogspot.com
i made these!
they were excellent. i felt really proud of myself while i was food-processing the oats. i just imagined my food-processor was actually made of stone and powered by horses.
the most satisfying thing about roasting your own almonds – they all taste slightly different! I swear!
Hi Sarah, it´s Unna from the Raw Tribe 😉 I love your blog, I check it every day! and your recipes are to die for 😉 I just launched my own website on positivity and happiness, it´s called http://www.positivelifestylechange.com, check it out 🙂
Hi Sarah,
I found your blog from my “Bon Appetit” magazine. Thank you for sharing your recipes! I made your banana bread tonight. It was very delicious.
I was not aware that raw nuts were hard on the digestive system, I am glad I learned to soak or roast them! Also, the almond butter and jam sandwich cookies look great! I will most definitely make these.
Ah, perfection in a cookie. Perfection in a snack. I cannot wait to try these! My friend Cara from http://www.carascravings.com posted a link to these – thank you Cara! I’m definitely going to give these a try. I’m thinking about filling them with some homemade hazelnut cocoa (like Nutella) spread. Thank you!
Hi,
I didn’t know about the enzyme inhibitor effect on human digestive enzymes… do you have a source for that info? I’d love to learn more. Thanks!
If I dont want to make roasted nut butter, should I soak the nuts prior to making the nut butter for easier digestion? Will the recipe still work? Thanks!
These look wonderful. I am a huge fan of almonds (and almond butter) and I think they make for such tasty cookies. I will have to get on to making some jam!
Beautiful. I love nut butters, too, but haven’t tried making my own yet. You make it sound very easy. 🙂
Love love love your blog!!!
Good tips, delicious recipes and beautiful pictures.
I’ve borrowed a few of your pictures for a little blog recommendation on my blog. Hope it’s okay – If not I will remove them 🙂
Regitze
http://regitzeolischer.blogspot.com
Hi Sarah,
Some time ago, I read your post on hazelnut butter and decided to give it a try. What a revelation! I’ve since made almond, brazil nut (very runny but so darn good), hazelnut, and pine nut. I’ve added honey, sea salt, chilis, cocoa powder. It_has_been_life_changing. Thank-you thank-you! Also, I wanted to say thank-you very much for the time and care you take investigating food industry practices and issues. I followed up on the aflatoxin peanut issue and was astonished to see how well documented it is. So thanks again for both caring and sharing. I’m a fan.
Now on to cookies!
Hi Sarah,
I just came across your blog after reading the recent issue of Bon Appetit. Love your recipes and photography! I am a vegetarian and fellow Torontonian (:
I’m really interested in making several recipes from your blog, but I’m having trouble locating your older recipes. For example, if you click on the desserts link (sweet tooth!), I cannot actually view the 35 posts. Do you have a master recipe archive or organized list of recipes, as many other food blogs such as 101 cookbooks or smitten kitchen do?
Many thanks for your help!
These are such an incredible idea…love that sticky jam filling and anything with nut butter in gets my vote 🙂
I’ve been wanting to make almond butter for ages and this seems like a great motivation. Those cookies look awesome! As I made a peanut jelly and sandwich just yesterday I was thinking about how to turn it into a cookie.
These sound yummy and so easy!
Daisy Dayz
..i think i just found my new favourite blog!
greetings from finland 🙂
What did I do wrong!! I can’t seem to make my almonds turn into butter 🙁
They are almond meal and I have been processing for over 10 minutes…
YUM! these look so good. do you think I could use flaxmeal/flax seeds in place of the Chia?
You must be reading my mind, because I was looking for something to do with a kitchen mishap made the other day.
I intended to make almond meal with blanched (raw and untoasted) slivered almonds but ended up with a chunky butter instead. Guess it’s not possible to make almond meal at home?
Anyway, I actually tried dehydrating the mixture for a while before I realized – DUH! – that the texture would never become dry and crunchy since you can’t dehydrate the oils. So now I have a jar of pale, not-very-smooth almond paste. Do you think I could use that to make these cookies or should I process longer to achieve a smoother texture?
Thanks so much! You always inspire…Karen
hey, they look and sound great!
chia seeds are really hard to find, where i live though. could i replace them with ground flax or eggs?
Had some almonds here. Just made my butter. =]
xoxo
Can you make almond butter from the raw almonds or do you have to roast them? I like the taste of store bought raw almond butter better than the regular kind…
It looks like I’ll be making almond butter in the near future! Thanks, Sarah!
Hi Sarah. I adore your blog and would value your opinion on almond flour. I’ve been told by some people that the ratio of omega-6 to omega-3 in almonds is too high and that I should avoid them altogether. What do you think? Should I replace almonds by a “better” nut like macadamias? Thanks!
almond butter is seriously one of the best things out there. SO YUMMY!
Love! I still have toast with almond butter and jam many mornings for breakfast. And I’ve yet to make my own nut butters, which is a shame.
I love the idea of these (they’re a healthy cookie if there ever was such a thing) and they look so good. I’m unfamiliar with coconut sugar…I’ll have to keep a look out for it.
Looks so yummy!! Do you think other flours such as quinoa flour would work? I am out of oats in my house 🙁
CAN I COME OVER?! like now?! <3
off to buy almonds today,then..
My favorite is to mix hazelnuts & almonds when making nut butter – guess you would like that combo considering these to butter me up posts!
Hugs! //Elenore
I am excited to try these! Almond butter has been at the top of my list of favorites for sometime and I’m always happy to find a new rec recipe with it in.
Will definitely be making these soon!
On another post (chocolate milkshake miracle) – if one is allergic to bananas, what would you suggest as a substitution for them in this recipe? Sorry – but couldn’t comment there.
So this is pretty much my dream cookie. If it’s not soft + filled with chocolate chips, this is what I want. I’ve always been a fan of PB + J’s and actually hated almond butter until I made my own. As always, love the information on raw nuts vs. light roasting. Thanks!
These looks amazing! I love that you have chia seeds in teh cookie recipe, wonderful!
Yum!!
I so want these!! LOVE nut butters too 🙂 !
I love almond butter. These cookies look wonderful and gluten free too, can’t wait to try!
Ah, the glossy filling looks incredible! If only I have a food processor, too… really time to get one soon, methinks.
These look awesome! i’ll definitely try them! I think you mean 200 grams of oat flour, right? not 20..
Yummmm!
These looks incredible!
Peanut butter and honey was definitely one of my favourites as a kid, and now it’s tahini and jam.
But I think this could replace all of them – and rightly so. I’ve never made my own nut butter before, but given that the smell of toasting almonds always makes my mouth water, I’m really going to have to make my own!
Thanks Sarah B! I love how inclusive your recipes are too 🙂