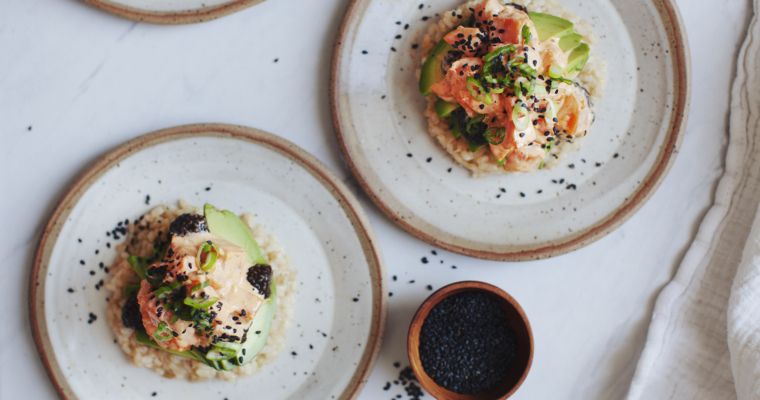
Necessity is the mother of invention, and when you’re missing all of your kitchen equipment, you get creative. We’ve been living out of a single suitcase for some months now, and although I have found a couple of major necessities in the mountain of unpacked moving boxes, I haven’t been able to locate my silicon loaf pan. As someone who makes the Life Changing Loaf of Bread on the reg, it’s been a challenge living without, but a stellar opportunity to come up with bread alternatives that don’t involve a lot of ingredients or special equipment. As I was chopping up some sweet potato for a soup a couple of weeks ago, it dawned on me: what if I cut the sweet potato the other way and turned it into a slice of bread?! It was just crazy enough to work. And it did.
Ever since then, I’ve been roasting sweet potato slices once a week, keeping them in my fridge and having a sandwich-like-thing when the mood strikes. It’s delicious! Not to mention wildly satisfying and so easy to make. I’ve experimented with different herbs and spices on the sweet potatoes, using special salts, and even drizzling with flavoured oils once they’re out of the oven. So far, I’m digging smoked salt and garlic powder, but the cinnamon, ginger, and cardamom combo was a close second at breakfast, smeared with chunky hazelnut butter.
The spread I’ve come up with as a pairing to this sandwich sitch, is a horseradish and beetroot “schmear”. Partly because I like saying the word schmear, but mostly because it’s incredible in combination with the sweet potatoes. It’s earthy, spicy, and complex – a great counterpoint to the sweetness of the spuds. I also like the texture difference: the sweet potatoes are so smooth and creamy, while the beet schmear is chunky and toothsome. If you’ve never had fresh horseradish before, be prepared to be blown away! This stuff is so, so special and delicious, I have no idea why it’s such an under-utilized root veggie.
A part of the Brassicaceae family, horseradish shares ties with mustard, broccoli, cabbage, and wasabi. In fact, most commercially-available wasabi is made of horseradish (along with mustard, starch, and green food dye) since wasabi is challenging to grow and therefore much more expensive. But that familiar and addictive rush of sinus-clearing pleasure-pain? That’s the action of isothiocyanate, the compound found in wasabi, horseradish, and strong mustard that gives off heat when crushed, grated, or chewed. This stuff tends to mellow out once it hits the air, which is why horseradish snobs (they exist!) insist on grating it fresh. In the case of my schmear here, it will still taste delish a day or two after you’ve made it, but you may want to grate a little fresh over the top for a boost. It’s the best way to clear out those nasal cavities this side of a neti pot!
Horseradish has been used as powerful winter medicine for hundreds of years. Widely recognized for its expectorant capabilities, it is incredibly effective at removing mucus, and aiding with bronchial and lung disorders. Horseradish is a good source of vitamin C and zinc, two key players in immune system support, so consuming it in the colder months will help ward off the seasonal bugs flying around. For sore throats and coughs, combine one tablespoon of freshly grated horseradish with one teaspoon of raw honey, and one teaspoon of ground clove to some warm water. Sip the brew slowly, or use it as a gargle.
This is more of a concept than a recipe, and a chance to try out sweet potatoes in a new way. Cut them as thick or as thin as you like. Mine are around 1cm, but that is just my personal preference. Remember that the slices will definitely shrink a bit during cooking, so slice them a tad thicker than you would want the finished roasted slice to be. You can even make shapes with a cookie cutter – great for kids lunches! Let your imagine run with this one, and keep me posted on which spreads and seasonings you’re vibing on.
Sweet Potato Sandwiches Makes 6-8 sandwiches
2-3 fat, stubby sweet potatoes (organic if possible)
coconut oil for rubbing (optional)
salt and pepper + other spices or herbs
1 batch Horseradish Beet Schmear (recipe below)
sliced fresh veggies: bell peppers, cucumber, avocado, sprouts, grated carrot etc.
Directions:
1. Preheat oven to 375°F / 190°C.
2. Wash and scrub sweet potatoes well, then slice lengthwise into 1 cm-thick slabs (approximately .4 inches). Place on a baking sheet and rub with coconut oil if using, and sprinkle with salt and pepper, plus any other spices or herbs you’d like.
3. Place in the oven and bake until tender, about 20-25 minutes. Remove from oven and use immediately or store leftovers in an airtight container in the fridge for up to five days.
4. To assemble, spread one slice of sweet potato with the Horseradish Beet Schmear. Top with your favourite sliced veggies, sprouts, salt and pepper and another slice of sweet potato. You can also add mustard, vegan mayo, or any other condiment that you like. Enjoy!
Horseradish Beet Schmear Makes 2 cups / 500ml
Ingredients:
1 lb. / 500g beets (about 4-5 small)
coconut oil for rubbing
1 small clove garlic
3 Tbsp. freshly grated horseradish, or more to taste
3 Tbsp. tahini
3 Tbsp. freshly squeezed lemon juice
1 Tbsp. cold-pressed olive oil
½ tsp. fine sea salt, to taste
¼ tsp. freshly cracked black pepper
Directions:
1. Preheat oven to 400°F / 200°C. Rub beets with a little coconut oil, set on a baking try, and place in the oven. Roast for 20-30 minutes until you can easily pierce the beets with a sharp knife tip.
2. Remove baking tray and let cool until you can handle them. Slide off the skins, or use a vegetable peeler. Roughly chop the beets and set aside.
3. In a food processor, pulse garlic until minced. Add horseradish, tahini, lemon juice, olive oil, salt and pepper, then blend on high to combine. Add the chopped beets and pulse to chop. Blend as much or as little as you like – I like my spread a bit chunky. Taste and adjust seasoning as necessary. Some may like more horseradish – go for it! Remember that the bite will mellow out when it’s mixed with everything in the sandwich.
4. Use immediately, and store any leftovers in a tightly sealed container in the fridge for up to five days.
Although the past few months of life limbo have been pretty frustrating, there are so many exciting things on the horizon that I cannot wait to share with you! First, my family and I are getting closer and closer to our new move-in date (you can watch house renovation updates on my Instagram Stories). Second, I’m heading to Palm Springs for an EPIC bloggers’ retreat organized by my friend Sasha Swerdloff at the end of this month. And I’m finishing up details on a sweet collaboration with one of my favourite juice bars in Toronto, that we will launch with a free public event! Stay tuned for more details on all the things.
I have to start by saying how incredibly moved I was by the comments on the last post, and the emails I received from you guys – a deep, heartfelt thank you. I knew that opening myself up would spark a lot of conversation, but I never imagined the impact it would have, not only in regards to the incredible outpouring of support, but for sharing your own stories and struggles. Time and time again I am reminded of the power in vulnerability and open communication. I feel truly blessed to have a community of conscious and loving readers, and that we can all share our journey with one another. That is what makes us stronger, and certainly healthier human beings in every sense of the word.
Before I dig deeper into what I’ve been doing to eat for balancing my hormones, I’d like to just follow-up with the topic of orthorexia. Many of you expressed surprise at my struggles, thinking that because I do what I do, I must have had it all together. The truth is I thought that I did have it all together for a very long time, and creating My New Roots has been the most powerful catalyst in my healing. For the last decade, I’ve felt very grounded in my choices and excited to celebrate them with you. But like I mentioned in the last post, the experience of changing my diet has brought back many of the challenges, dark thoughts and feelings that I had convinced myself were gone forever. Putting new restrictions on myself made me to put food into “good” and “bad” categories. This probably doesn’t sound so terrible, but like I said before, this is a slippery slope into full-blown disordered eating for me. I see now that there is an incredibly fine line between caring about what I eat and caring too much. I believe that my relationship to food is something that I may have to keep in check for the rest of my life, or at least as long as I choose to use it as a tool to become a healthier person (so, like, forever).
In the last four months of tuning into what I need right now, and eating more consciously, I’ve really experienced a positive difference in how I feel, which is the biggest reward anyone could ask for! But I’ve also had bad days where I wasn’t prepared, and suddenly being at a wedding or a birthday party, or out for dinner with friends without much to eat in the “good” category, wasn’t so rad. My blood sugar would crash, I’d feel desperate, totally out of control and the voices would come back. What I’ve learned from these experiences is that I need to be as prepared as possible in these situations, but if I can’t, I simply have to let go. I cannot control everything and I cannot always be prepared, but that in order to move forward, I have to maintain flexibility, and stop being so darn hard on myself! I firmly believe that there is more strength in being fluid and forgiving, than rigid and judgmental. I am just a person, after all.
Since many of you were curious about the connection between food and hormone balance, I’d like to discuss it in more detail, and share what I’ve been doing to keep these miraculous chemicals in check, and keep them working for me, not against me!
Upping my fat and protein intake – but especially fat Fats are an essential part of a healthy, well-balanced diet, and they are especially important for hormone balance. Fats actually create the structural components of hormones, and cholesterol specifically is responsible for our reproductive hormones; estrogen, progesterone and testosterone.
The type of fat you choose however, is critical to achieving a positive effect, as the ones you consume become the building blocks for your hormones. Saturated fats like coconut oil, butter and ghee, and monounsaturated fats like olive oil, nuts, eggs, and avocados are excellent choices and should be consumed responsibly every day. Cut back on or eliminate corn, canola, sunflower, safflower and soybean oils, and replace them with the aforementioned instead.
I’ve also increased my protein intake, and consciously replacing more high-carbohydrate foods with more protein-rich foods such as tempeh, hemp, sprouts, activated nuts, eggs, and quality protein powder has really made a difference in stabilizing my energy levels and appetite. Getting enough protein on a vegetarian diet is totally possible, but I find that if I’m not really paying attention, I can dip below the ideal 45 grams a day. Loosely (not obsessively) keeping track of my daily intake of protein has helped me feel my best.
Keeping my blood sugar stable It may seem totally unrelated, but blood sugar and hormones are in fact inextricably linked. One of the main functions of the endocrine system (the system that creates and transports hormones in your body) is delivering glucose to your brain, muscles, and heart. So if anything in that process isn’t working properly, than mismanaged blood sugar is the inevitable result. But what’s worse is that it creates a cascade effect whereby none of the other parts of your endocrine system will work either. Sheesh!
Walking the line between high and low blood sugar is something that I’ve really been focusing on lately, and it’s working well, but it is an ongoing process that takes some getting used to. Including more fat and protein in my diet has been a game-changer for me, since those macronutrients digest slower than carbohydrates – even the complex ones from things like sweet potatoes, quinoa, and chickpeas.
I try to eat a large and protein-rich breakfast within an hour of waking up (after the lemon water, of course!). Lunch is where I get the majority of my calories since that is when I need the most energy. I like eating roasted vegetables, avocado, eggs, and sprouted pseudo-grains like quinoa and buckwheat. I snack in between meals when I’m hungry, but instead of reaching for a slice of rye bread or a rice cake, I’ll have veggies with a high-fat dip, or a handful of my Maple Cinnamon Grain-free Granola. Dinner is mostly grain-free these days and I stick to salads, soups and stews. I go to bed no longer than four hours after dinner so that I’m not hungry right before I hit the pillow. Then I like to have a break of about 14 hours between dinner and breakfast the next day, as my digestion does well on the rhythm of intermittent fasting.
Eating more vegetables (and less bread a.k.a. DUH) I almost always had a couple slices of rye bread at lunch. Not that there is anything “wrong” with doing so, but I’ll admit to feeling pretty foggy-headed afterwards. And because it filled me up so much, I had less room for veggies. Now I’m prepping raw and cooked vegetables ahead of time and keeping them on hand specifically for my big lunches. Some favourites to roast in the oven are cauliflower, sweet potato, pumpkin, red onion, zucchini, tomatoes, and broccoli. I’ve also started cutting up a big plate of veggie sticks in the early afternoon, before I even get hungry, so that it is there and waiting for me – no excuses. Right before diving in I douse it in freshly squeezed lemon juice, Maldon salt and Aleppo pepper. It’s honestly delicious.
I don’t have to tell you that vegetables are full of filling fiber, replenishing phytonutrients, and yes, protein. Especially dem green ones. Eat more plants.
Habits + meal prep I think this was the other big hurdle for me when it came to changing things up with my eating habits. I knew that if I was going to start eating food differently, I’d have to start preparing food differently too – and a lot more often. I already spend a lot of time in the kitchen (obvi) and I love it, but I am also a person who likes to spend her non-work hours away from the cutting board. Eating this way admittedly does take more time, and makes it more challenging to eat out, or just grab something on the go. Coming to terms with this was challenging, but I’ve realized that I have to dedicate more time to my diet if I want to be successful. No matter how you slice it, meal preparation is a very big part of sticking to your goals, whatever they may be. Of course there are times when it’s just not possible to do, and divergent days are fine, but the majority of your food you’re should fall into the category that helps you feel your best, however you define that.
Instead of prepping one day a week, which I know a lot of people like to do, I actually prefer to pepper it throughout the week in a way that is a little more fluid for me. If the Life-Changing Loaf of Bread is in the oven for instance, I’ll chop up a bunch of veggies, and put them in too. If I’m washing greens for a salad, I’ll do all of them so that they’re ready to chuck into a smoothie on a whim. Lee from America’s Fat Balls have also been a super snack these days. And like I mentioned before, having fresh veggies washed and sliced up for afternoon cravings is very helpful. I can prepare two or three day’s worth at a time and keep them in the fridge.
Mindset Instead of looking at food in terms of “good” and “bad” which I think is a dangerously judgemental way to categorize what we’re eating, I like to say “yes” to certain things, and the others fall into the “not-right-now” basket. For instance, I love brown rice to the ends of the earth and back, but I’m not eating it right now since it doesn’t make me feel all that great. And just because I’m not eating brown rice these days doesn’t mean I’ll never eat it again! This leaves room for flexibility and creates a far more sustainable way to look at one’s diet. Isn’t it relieving to know that if you are out for dinner and there’s only rice for example, that you could potentially eat it and not beat yourself up? Ahhhh…did you feel that?! What a relief, eh? Tomorrow you’ll get back on the horse, no big deal at all. Making changes should be fun, and keep those labels for tin cans! You’re a fluid being, ever-changing, so make space for that in your meal planning too.
Self-care routine, stress-reduction, exercise, and sleep I used to see self-care as something that only “people with time” have. Well, after totally hitting the wall a while ago, I realized that it just has to be a priority, respected as a part of a holistic approach to health, and something to actually schedule in the calendar. Staying active, sleeping, and treating myself to some yummy stress-reducing activities like spending time in nature, bodywork, and cooking (go figure) keeps me feeling happy and relaxed. Squelching stress doesn’t happen by accident: it is truly a daily practice and something to be mindful of. Listen to yourself. How can this moment be juicier and more relaxing? It’s fun to love yourself!
Keeping stress levels low means that your body will be relaxed and not producing hormones that should only be reserved for emergency situations. Cortisol is a stress hormone released by the adrenal glands. Every time we experience a stressful situation we secrete this hormone into the blood stream so that our bodies can deal with the stressor at hand. Although cortisol is our friend in acute situations, our systems aren’t designed to be pumping it out ‘round the clock as we juggle and struggle with backlogged emails, fussy kids, and traffic jams. This is why chronic stress is so detrimental to our bodies: prolonged, elevated cortisol levels wreak all kinds of wrong inside of us, raising our blood pressure, causing unwanted weight gain, exhaustion, anxiety, impaired brain function, and weakening the immune response. All the more reason to take self-care seriously, and do the things you love more often. It’s actually healthy.
Sleeping 7-9 hours a night is another non-negotiable. Getting enough sleep helps us to control our cortisol production, balance our blood sugar, and put us back in line with our natural circadian rhythm. Turning screens off an hour before bedtime will help signal to your body that it is in fact, night time. Create a relaxed, cozy environment and spend the last hour before bed reading, stretching, or meditating. I still struggle with this one, as I love looking at Instagram right before turning out the light, but I’m becoming more mindful and doing my best.
Required Reading There are a few really amazing books out there that I recommend every woman reads, whether or not you’re seeking advice on a particular health issue. Understanding our bodies and cycles is the first step in helping ourselves become healthier, stronger, more connected women. Woman Code by Alisa Vitti has been hugely educational and supportive for me. Her book is a guide to figuring out what the heck is going on inside you, and how to correct it through diet and lifestyle. I appreciate her easy-to-understand language and humour in this book, because let’s face it: nothing is very funny when you’re hormones are raging! The Complete Natural Medicine Guide to Women’s Health by Dr. Sat Dharam Kaur has been and continues to be another excellent resource for me. This book is more of an all-round toolkit for lifelong health and healing, than specifically about hormone balance. I love the holistic approach to all conditions, and inspiring programs to get us back in touch with our natural cycles in connection to the earth. The third book I recommend is Hormone Balance by Carolyn Dean. Dean is a naturopathic doctor that utilizes both traditional and alternative solutions to help readers rebalance their hormone levels. Her writing is engaging and inspiring, and this book is full of ways for women to achieve greater overall health.
Oh man, I haven’t even talked about the tacos yet!
So. I got the idea for these this past summer when I was chopping up tempeh to replace ground beef with in a tomato sauce for pasta. It turned out so meaty, satisfying, and delish that I thought I could perhaps take that same idea, spice it up a little differently, and serve them in a taco. Woot! I knew that grilled veggies and red cabbage would help cut the richness, but that I would also need a boss sauce to put them over the top. During one of my retreats I made a raw queso in our cooking class and everyone went wild for it. It seemed like a natural fit! Topped with some lime, avo, pickled red onions, and cilantro these were the best tacos I’ve ever had. Ever.
Ever.
And I’ve had a lot of tacos.
I know some of you are going to ask about the corn tortillas and probably remind me that corn is a “grain”. Yes, I am aware of that, and I’ll remind you that I am not grain-free, just cutting way back. I stick mostly to pseudo-grains and make sure they are soaked prior to cooking, and enjoy a treat like this once in a while. I only purchase tortillas made with sprouted corn, or from corn that has been nixtalmized (that topic is a whole other blog post!). I buy my corn tortillas from Hija de Sanchez here in Copenhagen. Their tortillas are made fresh daily using nixtamalized corn imported from Mexico, so they taste unbelievably good. Of course taco fillings are important to a good taco, but the tortilla quality should not be overlooked! It makes the dish. Go find the good ones.
Tempeh Tacos with Raw Cashew Queso Serves 3-4
Tempeh Taco “Meat”
250g / 8.8oz organic, non-GMO tempeh
1 medium red onion
4 cloves garlic
1 Tbsp. coconut oil or ghee
1 tsp. ground cumin
½ – 1 tsp. chipotle or smoked hot paprika, to taste
2 Tbsp. tamari
2-5 Tbsp. water, as needed
Grilled vegetables
1 medium zucchini
1 medium red onion
1 red bell pepper
½ tsp. fine sea salt
1 tsp. ground cumin
a couple pinches of cayenne, if desired
12 small corn tortillas (try to find organic, non-GMO if possible)
1 batch Raw Cashew Queso, recipe below
Optional add-ins:
1 ripe avocado
1 small bunch cilantro
pickled red onion or thinly sliced red onion
shredded red cabbage tossed with a little salt and lime juice
limes for serving
hot sauce
Cooking and assembly:
1. Start by making the Raw Cashew Queso (see recipe below).
2. Heat your grill or barbecue to medium-high. If not using a grill, simply cook everything in a skillet on the stove.
3. Finely chop or crumble tempeh into whatever size appeals to you (mine were rather small to mimic ground beef). Set aside. Mince red onion and garlic. Set aside.
4. Soak wooden skewers in water while you prepare the vegetables, or longer if you remember. If using metal skewers, skip this step.
5. Wash and cut the zucchini and onion into rings, the peppers into chunks. Place in a large bowl and toss with the salt and spices.
6. Skewer the vegetables so that their largest surface will lay flat on the grill (see photo). Alternate veggies until you’ve used them all. Place on the grill and cook until stating to char on the underside, anywhere from 5-10 minutes, depending on your cooking method. Flip and cook on the other side.
7. While the vegetables are grilling, cook the tempeh. Heat your cooking oil in a large skillet over medium heat. Add the onion and a few pinches of salt. Cook until starting to brown, about 7-10 minutes. Add garlic and cook for another minute until fragrant. Add crumbled tempeh, cumin, chipotle, and stir well to incorporate. Pour in the tamari, followed by a couple tablespoons of water. Stir well and add water as needed – you’re after a moist mixture. Taste and adjust seasoning as desired. Cook for a total of 10 minutes. The mixture should be golden brown, hot and delicious!
8. Warm the tortilla shells on the grill or in a pan over medium-high heat.
9. Spoon the desired amount of tempeh into each tortilla shell. Followed by the roasted veggies, avocado, cabbage, cilantro and pour on the Raw Cashew Queso. Enjoy!
Raw Cashew Queso Makes about 2 cups / 500ml
Ingredients: 1 cup / 150g cashews, soaked for 4-8 hours or overnight
1 red bell pepper
½ tsp. salt
2 Tbsp. nutritional yeast
2-3 tsp. freshly squeezed lemon juice, to taste
½ clove garlic
1 small piece fresh turmeric
ground cayenne, to taste
½ cup / 125ml water
Directions:
1. Drain and rinse the cashews.
2. Put all ingredients, except water, in a high-speed blender or food processor and blend, adding water one tablespoon at a time until the desired consistency is reached. If you want a thick cream, use less water, for a thinner sauce, use more. (You will not achieve a perfectly smooth sauce with a food processor, but it is still delicious!).
Before I go I just want to reiterate how wonderful it felt to be met with such open arms after the last post. I wish I could write back to every single one of you who shared their story with me, and everyone else here, but I simply couldn’t get to them all. I am moved beyond words that so many of you felt open and supported in this space too, and I will urge you to seek out help if you need it. And if you know someone who you think may struggle with disordered eating, reach out and help them in a loving, and non-judgmental way. We are all in this together.
In love and light,
Sarah B
* * * * * * *
http://www.goldencircleretreats.com/portugal/index.html
Dear friends! I am thrilled to share the location for my next wellness retreat in magical Comporta, Portugal, November 5-11, 2017. Join Mikkala Marilyn Kissi and I at Sublime Comporta for seven days of luxurious living, divinely delicious meals, inspiring cooking classes and nutrition seminars, yoga, Pilates, meditation, and breath work. Come press the reset button with me! Ride horses on the beach, dance under the stars, and cozy up by the fire. This will be a week to remember. I can’t wait to see you there! Click here for more info and tickets.
It’s pretty redundant to say that I love cooking. So much. But even though I find myself enamoured with some small detail of every meal that I make, this chickpea pasta was next-level emotional. In fact, was one of the few recipes I’ve made in my entire life that turned me into a wide-eyed child again, and reaffirmed my deep, unrelenting passion for creating food. Kneading the dough, rolling the pasta through this perfectly designed machine, seeing it transform before me, mysteriously almost nothing into so very much. I’m not ashamed to say it nearly brought me to tears. There is something about cooking – and cooking something so ancient – that delivers a feeling of satisfaction that can hardly be described. It’s entirely transcendental. And the best part? You get to eat it.
It all started when one of my dear friends suggested making pasta out of chickpea flour and that she had seen a vegan version using ground flax seeds. I found the recipe and followed it, but it didn’t work, I tried again, and after another pretty epic fail where I felt totally out of my depth, I decided to go the classic egg route. Not only was it better, it was absolutely, unbelievably delicious. In fact, I could hardly trust that what I was eating was made from chickpea flour, since it tasted so much like the beloved white pasta of my past. How is this not a thing?!It’s so easy and infinitely healthier, why isn’t everyone and their uncle Bob making pasta with chickpea flour?
I made this pasta three time in a week and found the prefect al dente cook time, all kinds of things to dress it with (olive oil, Pecorino, black pepper – guh.), and that I could freeze it to come back later and pop a nest into boiling water for almost-instant dinner that even my three-year-old loves. Rejoice!
The only potential issue with using chickpea pasta like this is that since the chickpea flour is made from ground raw chickpeas, and some people who are sensitive to legumes may find this difficult to digest (i.e. lots of farts). I don’t know how to overcome this issue since sprouting the chickpeas, then dehydrating them, then grinding them seems like a whole lotta rigmarole, so I’m using chickpea flour and calling this an indulgence, like socca. If you know you have legume issues, I suggest purchasing sprouted chickpea flour, which is a little more challenging to find, but you can certainly buy it online.
Now that I understand the correct moisture levels and consistency, I’m going to go back and try the vegan version again, perhaps using something other than flax this time. If any of you have had success, please let me know!
Do you need a pasta machine for this recipe? Kind of. Unless you are very skilled at rolling out pasta by hand, I recommend picking one up (there’s always one at the second-hand store). Pasta machines are simple to use, and make this process very fast, fun, and satisfying. The one I have is pictured below (it’s Atlas brand #notsponsored), and it creates flat sheets that are perfect for lasagna or ravioli, or you can run the thin sheets through the spaghetti or tagliatelle roller, like I have done for this recipe.
And there’s another recipe in this recipe, and that is for the delightful Basil-Pea Pesto. Herb-y, nutty, and bright, it’s a cinch to whip up and keeps for 2-3 days in the fridge, so you can make it ahead or use the potential leftovers for many delish things (it’s a great dip or sandwich spread). Use frozen peas if that’s all you have – no stress! And I like to use even more peas and basil to finish this dish off, so that it is even more satisfying with all the bright flavours and textures. I hope you enjoy it as much as my family does.
Chickpea Pasta with Basil-Pea Pesto Serves 4-6
Ingredients:
1 batch chickpea pasta (recipe follows)
1 batch Basil-Pea Pesto (recipe follows)
2½ cups / 350g shelled green peas (fresh or frozen)
a small handful of basil leaves
Olive oil to garnish
flaky sea salt and black pepper
Chickpea Pasta
2 – 2 ½ cups / 250 – 310g chickpea flour
3 large eggs, organic and free-range if possible
1 tsp. fine sea salt
1 Tbsp. cold-pressed olive oil
Directions:
1. Measure out 2 cups / 250g of chickpea flour and place in a mound on clean work surface. Make a large well in the center of the mound and crack three eggs into it, along with the salt and olive oil. Using your hands, mix the ingredients together until you have a smooth dough (if the mixture is dry, add a tablespoon of water to moisten it. If the dough is wet, add the remaining flour, one tablespoon at a time until it less sticky). Knead the dough for about five minutes, then cover tightly with plastic wrap and let rest at room temperature for at least half an hour.
2. Unwrap the dough and divide it into quarters, then again for that you have about eight equal portions. Work with one portion at a time, and cover the rest. Flour your work surface and work the dough into a square-ish shape, about the width of the pasta maker (the pasta will become much longer, not wider, so it’s best to take full advantage of the width). Flour the dough again and run it through the thickest setting on the machine (usually #1). Change settings to the slightly thinner setting (usually #2) and run it through the machine. If your pasta sticks at all, dust both sides with more flour. Repeat until the pasta is your desired thickness, then feed it through the cutter of your choice. I went to #6 before cutting it into tagliatelle.
3. As soon as the pasta comes through the cutter, toss it generously with flour and spread it out on clean work surface to dry, or use a pasta drying wrack if you have one.
4. Bring a pot of well-salted water to a rolling boil. Add the amount of pasta you’re using to the water and cook for about 2-3 minutes (don’t overcook! This pasta will disintegrate quickly if boiled for too long). The pasta should float to the top of the pot when it’s ready and be al dente. Drain and plate quickly.
5. You can finish this pasta two ways: one, place the pasta back into the pot and fold in the peas, basil, desired amount of pesto, and a glug of olive oil, the divide among the plates. Alternatively, divide the pasta among the plates, dollop with the pesto, drizzle with olive oil, and garnish with pine nuts and basil. Grind fresh pepper over the top and serve immediately.
Basil-Pea Pesto
Ingredients:
1 clove garlic
½ cup / 55g pine nuts
zest of 1 lemon
3-4 Tbsp. cold-pressed olive oil (as needed)
½ tsp. fine sea salt
2 cups loosely packed / 35g fresh basil leaves
1 cup / 140g shelled green peas (fresh or frozen)
Directions:
1. Bring a pot of salted water to the boil. Add peas and turn off the heat. If using fresh peas, let them sit for about 2-3 minutes until bright green. If using frozen, let them sit for about 5 minutes. Drain and set aside.
2. In a dry skillet over medium heat, toast the pine nuts until lightly golden. Remove from heat and set aside.
3. Place peeled garlic in a food processor and pulse to mince. Add the toasted pine nuts (reserve a few for garnish), olive oil, salt, basil, and one cup / 140g of peas and blend on high to mix. Add more olive oil if you like a looser pesto. Taste and adjust seasoning if necessary.
I’m currently on holidays in Canada and I’m going to keep this post short and sweet so that I can get back to all of my funky food projects, reading on the dock, and naps. So many naps. I hope you’re all having a glorious summer so far!
Big love,
Sarah B
Show my your pasta on Instagram: #mnrchickpeapasta
*****
Dear friends! I am getting SO excited about hosting my next wellness retreat in Ibiza, Spain, September 5-10 and September 17-23. And I’ve decided to offer the same program twice so that more of you can join in. This is going to be an intimate group of 12 women only, housed in a stunning, 400 year-old finca in the hills surrounded by fig trees, wild herbs and carob. Come join me for seven days of total inspiration and rejuvenation – delicious and healthy meals, cooking and nutrition workshops, yoga, pilates, dance, and meditation that will balance your body and mind, and empower you to move forward on a path to greater wellness. I can’t wait to see you there!